Tutorial - Writing a HUDModule
This tutorial will cover writing a custom HUD component for displaying your current speed, compatible with the Ubermenu preset.
It is assumed you have TAMods and the Ubermenu working, and that you are familiar with customising the HUD in-game via the Ubermenu.
Part 1: Setting up your hudmodule script
Custom HUD component scripts must be stored within the Ubermenu preset, at <Documents>/My Games/Tribes Ascend/TribesGame/config/presets/ubermenu/hudmodules. Navigate to this directory and create a new file called Tutorial_Speedbar.lua.
Adding the skeleton
In this file, we'll first add the skeleton information that the Ubermenu needs for our HUDModule. The following is an annotated HUDModule skeleton; add it into your Tutorial_Speedbar.lua.
-- The module object contains all the information about our custom HUD module
local module = {}

-- The name of the module - this must be the same as the filename without .lua on the end
module.name = "Tutorial_Speedbar"
-- The module.opts object will hold all the options for users to configure in the Ubermenu
module.opts = {}

-- The module.draw function is where we'll write the drawing logic for our module
function module.draw(res_x, res_y)

end

-- Our script should return the module at the very end of the file
return module
Drawing "Hello World"
Now we have the skeleton, we can make our script draw something! To test that we've set things up correctly, let's start by simply drawing the text "Hello World".
Add the following inside the module.draw function:
drawSmallText("Hello World", rgb(255, 255, 255), 10, 10, enums.TEXT_ALIGN_LEFT, 0, 1)
This draw command will draw the text Hello World in white in the console font, at pixel position (10, 10) on the screen.
Testing it out
To test this out, open the game, enter Roam Map, and open up the Ubermenu. Under HUD Maker > Add Module, you should now see an entry labelled Tutorial Speedbar. Adding this module should cause "Hello World" to appear in the top left of the screen, as in the following:

If adding your module caused Lua errors to display in the console, then your script is incorrect. You will have to fix your script and use /reloadconfig to reload it before you can try adding it again.
Part 2: Writing a custom speedbar script
You can remove the drawSmallText call from your script. We will now make the script display a custom speedbar.
Adding module options
First, we'll add some options for the user to set to customise the speedbar. Add the following into your script, directly under where module.opts is assigned:
module.opts.X_Position          = 5
module.opts.Y_Position          = 40
module.opts.Width               = 30
module.opts.Height              = 200
module.opts.Max_Speed_Color     = rgb(255, 0, 0)
module.opts.Min_Speed_Color     = rgb(0, 255, 196)
module.opts.Background_Color    = rgba(0, 0, 0, 125)
We're adding options for the user customise the X and Y placement of the bar, its Width and Height, as well as the colours used.
Note that by convention, X and Y positions for HUDModules should represent a percentage of the screen width/height. This will allow your module to display in the same place regardless of what resolution you play the game at. For this script however, the Width and Height will be in pixels.
Calculating values
Now we need to write our module.draw function to actually display the speedbar. First, we need to calculate the values we need for displaying it.
Inside module.draw, add the following statements to ensure we only draw the speedbar when the player is alive and is skiing (or is in a vehicle):
if not hud_data.alive then return end
if not hud_data.vehicle and not player.isSkiing() then return end
The hud_data variable is provided by Ubermenu to give access to particular parts of game information (e.g. whether the player is alive) without having to call player.isAlive() yourself. Ubermenu checks the status once and exposes the value to all modules via hud_data because there may be many different modules that all need to know whether the player is alive.
These lines will cause the module.draw function to exit early, without drawing anything, in the event the player is dead or is not skiing/in a vehicle.
Next, we will calculate the pixel positions we will use for drawing:
-- We're using the X_Position and Y_Position options as percentages, so we need to calculate the pixel values for them
local xpos = math.floor(module.opts.X_Position / 100 * res_x)
local ypos = math.floor(module.opts.Y_Position / 100 * res_y)
-- Calculating the right, bottom and middle positions of the bar for use in drawing
local xright = xpos + module.opts.Width
local ybottom = ypos + module.opts.Height
local xmiddle = xpos + module.opts.Width / 2
Next up, we will figure out what proportion of the bar we need to fill, based on the current speed:
-- Get the current speed
local curSpeed = hud_data.vehicle and vehicle.speed() or player.speed()
local minVal = 50
local maxVal = 300
-- If the user has set custom min/max values for the default speedbars, let's use those
if skiBarMin and skiBarMax then
    minVal = skiBarMin
    maxVal = skiBarMax
end
-- Calculate the proportion of the way between minVal and maxVal that the player's speed is
-- But we will clamp the result between 0 and 1
local pct = math.max(0, math.min(1, (curSpeed - minVal) / (maxVal - minVal)))
Finally, we'll calculate the colour of our speedbar, by linearly interpolating between the minimum speed colour and the maximum speed colour:
local barColor = lerpColor(module.opts.Min_Speed_Color, module.opts.Max_Speed_Color, pct)
Drawing the speedbars
Now that we've calculated the values we need, we can actually draw our speedbars. First we'll draw a background and a border for our speedbar:
-- Draw the background
drawRect(xpos, ypos, xright, ybottom, module.opts.Background_Color)
-- Draw a border
drawBox(xpos, ypos, xright, ybottom, barColor)
Next we'll draw the bar itself:
drawProgressBar(xpos + 4, ypos + 4, xright - 4, ybottom - 4, barColor, 0, pct)
The above command will draw our speedbar inside our border; the second last parameter specifies the direction of the bar (the bar fills upwards in our case).
And finally, we'll draw the player's actual speed underneath the bar:
textSize = getUTTextSize(curSpeed, 1)
drawUTText(curSpeed, barColor, xmiddle, ybottom + 2 + textSize.y / 2, enums.TEXT_ALIGN_CENTER, 1, 1)
Here we are drawing the speed using an Unreal Tournament font; we've gotten the drawing size of the text so that we can offset its Y position to prevent it clipping into the bar.
Testing the module
The script is now complete. Try it out in the game and fix any errors (you can see the full, correct script below). It should look something like the following screenshots:
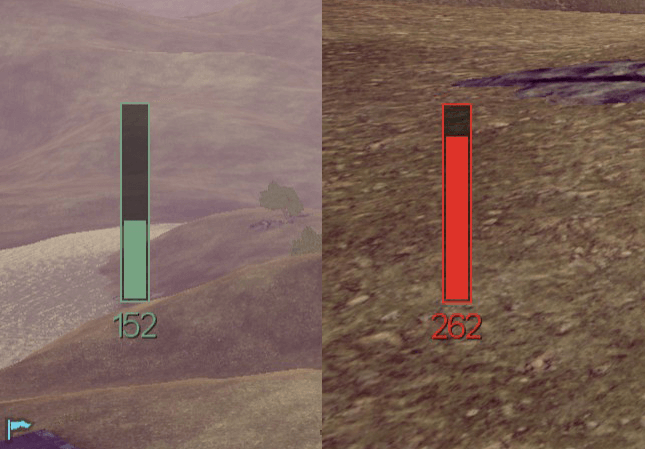
You've now written your first HUDModule! All HUDModules should use the same skeleton as this one; you can vary the options you present and the code in the module.draw function to display other things, and combine them with other TAMods features to build more complex custom HUDs.
The final script
local module = {}

module.name                     = "Tutorial_Speedbar"
module.opts                     = {}
module.opts.X_Position          = 5
module.opts.Y_Position          = 40
module.opts.Width               = 30
module.opts.Height              = 200
module.opts.Max_Speed_Color     = rgb(255, 0, 0)
module.opts.Min_Speed_Color     = rgb(0, 255, 196)
module.opts.Background_Color    = rgba(0, 0, 0, 125)

function module.draw(res_x, res_y)
    if not hud_data.alive then return end
    if not hud_data.vehicle and not player.isSkiing() then return end

    local xpos = math.floor(module.opts.X_Position / 100 * res_x)
    local ypos = math.floor(module.opts.Y_Position / 100 * res_y)
    local xright = xpos + module.opts.Width
    local ybottom = ypos + module.opts.Height
    local xmiddle = xpos + module.opts.Width / 2

    local curSpeed = hud_data.vehicle and vehicle.speed() or player.speed()
    local minVal = 50
    local maxVal = 300
    if skiBarMin and skiBarMax then
        minVal = skiBarMin
        maxVal = skiBarMax
    end
    local pct = math.max(0, math.min(1, (curSpeed - minVal) / (maxVal - minVal)))

    local barColor = lerpColor(module.opts.Min_Speed_Color, module.opts.Max_Speed_Color, pct)

    drawRect(xpos, ypos, xright, ybottom, module.opts.Background_Color)
    drawBox(xpos, ypos, xright, ybottom, barColor)

    drawProgressBar(xpos + 4, ypos + 4, xright - 4, ybottom - 4, barColor, 0, pct)

    textSize = getUTTextSize(curSpeed, 1)
    drawUTText(curSpeed, barColor, xmiddle, ybottom + 2 + textSize.y / 2, enums.TEXT_ALIGN_CENTER, 1, 1)
end

return module